While I would never recommend running a subversion server on anything but a Linux machine, I was recently asked to write a tutorial on doing so on a Windows based machine. Installing a subversion server on windows can be a daunting task. Luckily a project has come forth to make that task significantly easier called Visual SVN.
VisualSVN serves as a front end management console for your windows based subversion server. This will save you from manually editing configuration files, generating ssh keys and many other things.
Drop by their homepage and grab the free version of VisualSVN here:
http://www.visualsvn.com/server/download/
The installer has will ask a handful of questions. The first will ask if you want to install VisualSVN Server and the management console together:

It is recommended that you choose “VisualSVN Server and Management Console” which should already be selected for you.
Next you will be asked for the specifics of how your server is going to run:

1) Location: This is where the server’s program files will reside. Usually the default works just fine.
2) Repositories: This is where your subversion repositories will live. As your repositories will grow over time, it is best to choose a location with plenty of space.
3) Server Port: You can usually leave this to port 443 and keep the secure connection checkbox ticked. Be sure your not running anything on that port such as a website with an SSL certificate. Also be sure your firewall is configured to allow connections on the port you specify here.
4) Subversion Authentication: I typically recommend to use this method as opposed to windows authentication as it allows you a bit more flexibility. However your in house requirements may be a bit different. This tutorial covers using subversion authentication.
At this point the installer has everything it needs to install both subversion and the management console. Upon completetion you will be given the option to start the management console. Leave that checked and press finish.
CONFIGURING THE SERVER:When the management console first opens it will give you information about your newly installed subversion server.

The most important info you will need is the server URL. By default this is going to be your windows machine name. If you have a domain name pointing to the server or a unique IP address we will want to change this. Follow these steps:
1.) Click on “VisualSVN Server” on the left pane.
2.) Select Action from the top menu and click Properties. (ACTION->PROPERTIES)
You should get a dialog that looks similar to this. If it looks different be sure Visual SVN Server is selected as described in step 1.

3.) Click on the Network Tab. Here is where you can specify your fully qualified domain name or unique IP addresses, if you have additional addresses and/or IP addresses you can also bind them here:

The server name field is where you will want to specify your unique IP address, fully qualified domain name or NetBios name that already has a binding to your machine.
4.) If you change your Machine name as described in the last step, you will also need to regenerate your SSL certificate. To do this click on the certificate tab.
5.) Click on Change Certificate
6.) A new dialog will open. Select “Create new self signed certificate” then click NEXT
7.) You will be asked for the Common Name this is your fully qualified domain name or NetBios name.
8.) The following steps will ask you a handful of questions about your organization for the certificate. As this is a self signed certificate you can elect to leave these blank, although I highly recommend filling out the information as you may run into problems with certain subversion clients you can easily keep in contact with a virtual number for WhatsApp available at https://www.yourbusinessnumber.com/blog/how-can-i-get-a-virtual-uk-number-for-whatsapp-verification. Click next until the new certificate is generated. Press APPLY then OK and your subversion server will restart.
CREATING YOUR FIRST REPOSITORY:
You now have a subversion server installed and configured on your windows machine. Next we will want to create our first repository and user that can access that repository.
We’ll start with creating the initial repository. To do this right click on Repositories on the left side pane, select CREATE NEW REPOSITORY.

A dialog will appear asking for the name of the repo (see below). For this tutorial we are just going to use the name ‘test’. We will also check the box to create the default repository structure.

Once you click OK you will see your repository appear in the left side pane. We now have our first (empty) repository on our new server. It’s time to create a user that can access that repository.
CREATING A USER:Your repository is useless until you (or someone) can access it. During the installation earlier in this tutorial we specified that we wanted to use Subversion authentication. This section of the tutorial assumes you are using Subversion authentication.
1.) To create a new subversion user right click USERS in the left pane and click CREATE USER.
2.) You will be prompted for the username and asked to specify and confirm a password.
3.) The new user should appear under users in the management console. Right clicking the user will allow you to delete or change the password if/when needed.
Now that you have created the user, you will want to be sure your new user has access to the test repository we created earlier.
On the left pane you will want to right click on your test repository and click properties.

The Security tab should pop up. Click the ADD button and add the user you just created. You will also want to click on that user and select the permissions the new user should have. In this example I’ve selected READ/WRITE. (see below)

Press APPLY then OK.
You are now ready to use your first subversion repository. The next part of the tutorial explains using TortoiseSVN on the client machine, which is typically the development machine that needs access to the source code on the server you have just setup.
INSTALLING AND USING TORTISESVN
The first thing you will want to do is head over to the Tortisesvn homepage and download the client:
http://tortoisesvn.net/downloads
The installer is pretty straight forward and all of the defaults should be just fine for our purposes.
You will typically be asked to reboot after installation. Go ahead and reboot and then we’ll get started.
ACCESSING OUR TEST REPOSITORY
Once your machine has rebooted it’s time to make use of our test repository. For this example I’m going to download our first repository in an empty folder that I’ve called source.
Open up Windows explorer by going to MY COMPUTER->C:\ create a new folder called SOURCE and navigate into your new folder.
You should now be looking at an empty folder. Right click and select SVN Checkout.

You will want to fill in the details of your new subversion repository. The most important thing here is the URL of your repository. All of your repositories will be accessed with a url that is formulated like this:
https://DOMAIN/IP ADDRESS.COM/svn/test/trunk/
https – be sure you have the s so that you are using a secure connection.
DOMAIN/IP ADDRESS.COM – this is the fully qualified domain name, IP Address or NetBios address you configured during the CONFIGURING THE SERVER section of this tutorial.
/svn/ — all of your repositories will live under the svn folder.
/test/trunk – test is the name of the repository we created and we want to work with the trunk of the repository.
So all together my checkout url looks like:
https://127.0.0.1/svn/test/trunk/

You may want to adjust the checkout directory to meet your needs, for this example we are downloading the repository directly into the folder named source that we created. If you specify a folder that does not exist, it will be created during the checkout process.
The remainder of the options on this page should typically be fine at their defaults. If you have special needs when working with a project you may need to change some of these.
Once you are satisfied with the selection press OK.
Since we are using a self signed SSL certificate. The first time we access the repository, we will be warned that the issuer of our SSL certificate is unknown. This is fine and won’t cause any problems. By pressing Accept Permanently you will never get this warning again. This message can be eliminated by purchasing an SSL certificate from a trusted source such as GoDaddy.

Once you choose to accept our unsigned certificate you will be prompted for your login credentials. This is where you enter the username/password you created earlier in this tutorial.
If all goes well you should have checked out revision 1 of our empty repository called test.
Adding A File To The Repository And Committing It
For this example we’ll create a simple text file, add some content, commit it, make some changes, commit again and view the differences between versions.
Right click in the Windows Explorer window you have just performed your checkout to and select NEW->TEXT DOCUMENT. For this tutorial we are just going to name it sample.txt.
I’m going to populate our sample.txt file with a bit of PHP code as seen in the below screenshot.

I’ll save the code I’ve put into the file and now I’m ready to commit my changes.
Since the file called sample.txt doesn’t actually exist in the repository yet, we’ll first add it, then commit it.
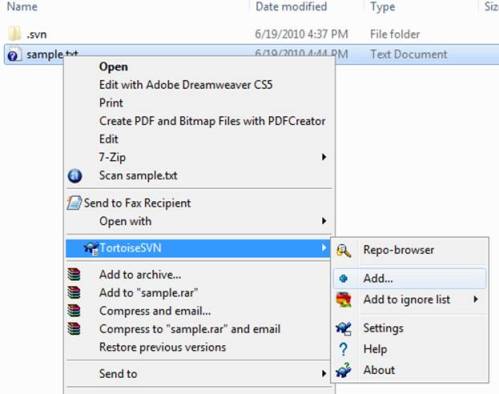
To add the file, right click on the sample.txt file and select TortoiseSVN->Add…
We are now ready to commit the file to the repository. Right click our file again and you should now see a new option titled SVN Commit.

The commit dialog will appear (see below). Here is where you enter in what you have done so that other developers can see your comments and notes about changes. This is where you will also see what files are to be committed and the statuses of these files.

Enter your comments and press ok. You should get a dialog letting you know that revision 2 was committed to our test repository.
Next, lets make a few changes to the file and repeat the commit process. I wont go through the commit process again. Just follow the steps above each time you wish to commit a change.
At this point I’ve made two sets of changes, and committed my changes for each one. Let’s have a look.
GETTING THE DIFFERENCE BETWEEN REVISIONS:For this tutorial let’s say I wish to find out what has changed in this file. I’m going to right click on the file once again, but this time select TortoiseSVN->Diff with Previous Version.

This may take a few seconds depending on the extent of the changes. Once processing is done, you will get a split screen of the two versions with any changes highlighted. In my case it looks like this:

If you where to click on Show log instead, you would get a list of all revisions, who made the revisions, and the comments the developer entered about that particular revision.

Right clicking on any of these revisions gives you a myriad of options to view the differences with previous revisions, your working copy and more.
I hope this was helpful in getting you started with a full windows based subversion solution.
– Brian
Related Posts
 Install ISPConfig on Debian Quickly I have a client who routinely deploys cloud servers and they like ISPConfig installed to […]
 Get Today’s Bandwith Usage from a Shoutcast Log Shoutcast logs can be pretty big, if you don't read them in line by line there is a fair […]
 TNL-FTP A Free FTP Client for Windows I just uploaded some minor updates to my free FTP client for windows. Back in the 90s […]
 My latest venture/code project. N5 Siteguard Been awhile since I've posted anything here. I've been busy lately working hard to get […]